
How to Make Creamy Baked Mac and Cheese with Bread Crumbs
We’ve all been there. You follow a recipe, but your mac and cheese comes out with a grainy sauce, mushy pasta, or a topping that’s more soggy than crunchy. It’s a disappointing outcome for a dish that promises so much comfort. The good news is that those common mistakes are completely avoidable. The secret to a restaurant-quality dish lies in a few simple techniques that guarantee a creamy, dreamy texture every time. We’ll show you why you should always grate your own cheese, how to cook your pasta perfectly al dente, and the key to a truly crispy topping. Get ready to leave those kitchen frustrations behind and master the perfect baked mac and cheese with bread crumbs.
Key Takeaways
- Choose Ingredients for Texture: Set yourself up for success from the start. Grate your own cheese from a block for the smoothest sauce, pick a sturdy pasta shape that can hold onto that sauce, and use Panko breadcrumbs tossed in butter for a guaranteed crispy topping.
- Master the Sauce with Patience: The secret to a perfectly creamy, velvety cheese sauce is all in the technique. Add warm milk to your roux gradually to prevent lumps, and always melt your cheese off the heat to keep the sauce from becoming grainy or oily.
- Bake Hot and Fast for the Perfect Finish: The final bake is all about the topping. Use a high heat (around 400°F) for a short time (10-15 minutes) to get the breadcrumbs golden and crunchy without drying out the creamy pasta underneath.
What You'll Need for the Best Baked Mac and Cheese
Before you even think about melting cheese, let's talk about the all-stars of this dish. A truly spectacular baked mac and cheese comes down to three key components: the pasta, the cheese blend, and that crunchy, golden topping. Getting these right is the secret to creating a dish that rivals the Southern comfort food we serve at our kitchen. When you choose your ingredients with a little intention, you set yourself up for a creamy, dreamy, and perfectly textured result every single time. It’s not about having the most expensive ingredients, but the right ones. Think of it as building a house; you need a solid foundation before you can start decorating. For mac and cheese, that foundation is a sturdy pasta, a flavorful and melty cheese sauce, and a topping that provides the perfect crunch. This isn't just about following a recipe; it's about understanding why each component matters. From the way the pasta holds the sauce to how the cheese blend creates that signature pull, every choice makes a difference. Let's break down what you'll need to gather to make a mac and cheese that will have everyone asking for seconds.
Pick the Perfect Pasta Shape
The pasta you choose does more than just act as a vehicle for the cheese sauce; its shape is crucial for trapping all that creamy goodness. Classic elbow macaroni is the go-to for a reason. Its hollow, curved shape is perfect for holding onto the sauce, ensuring every bite is packed with flavor. But don't feel limited to just one option. Other short pasta shapes like penne, ziti, or cavatappi work beautifully, too. The key is to pick a pasta with plenty of nooks and crannies that will cradle the cheese sauce and stand up to baking without getting mushy.
Build the Ultimate Cheese Blend
This is where the magic really happens. The secret to a rich, complex, and perfectly melty cheese sauce is using a blend of cheeses. A great rule of thumb is to combine one cheese that melts well with one that has a ton of flavor. For that incredible, gooey texture, think Gruyere, Fontina, or Havarti. For a bold, savory punch, you can't go wrong with a good sharp cheddar. A fantastic combination to try is a mix of Mozzarella for those epic cheese pulls, sharp Cheddar for that classic rich flavor, and Colby Jack for a buttery, creamy finish. Experimenting with different cheese combinations is half the fun.
Master the Crispy Breadcrumb Topping
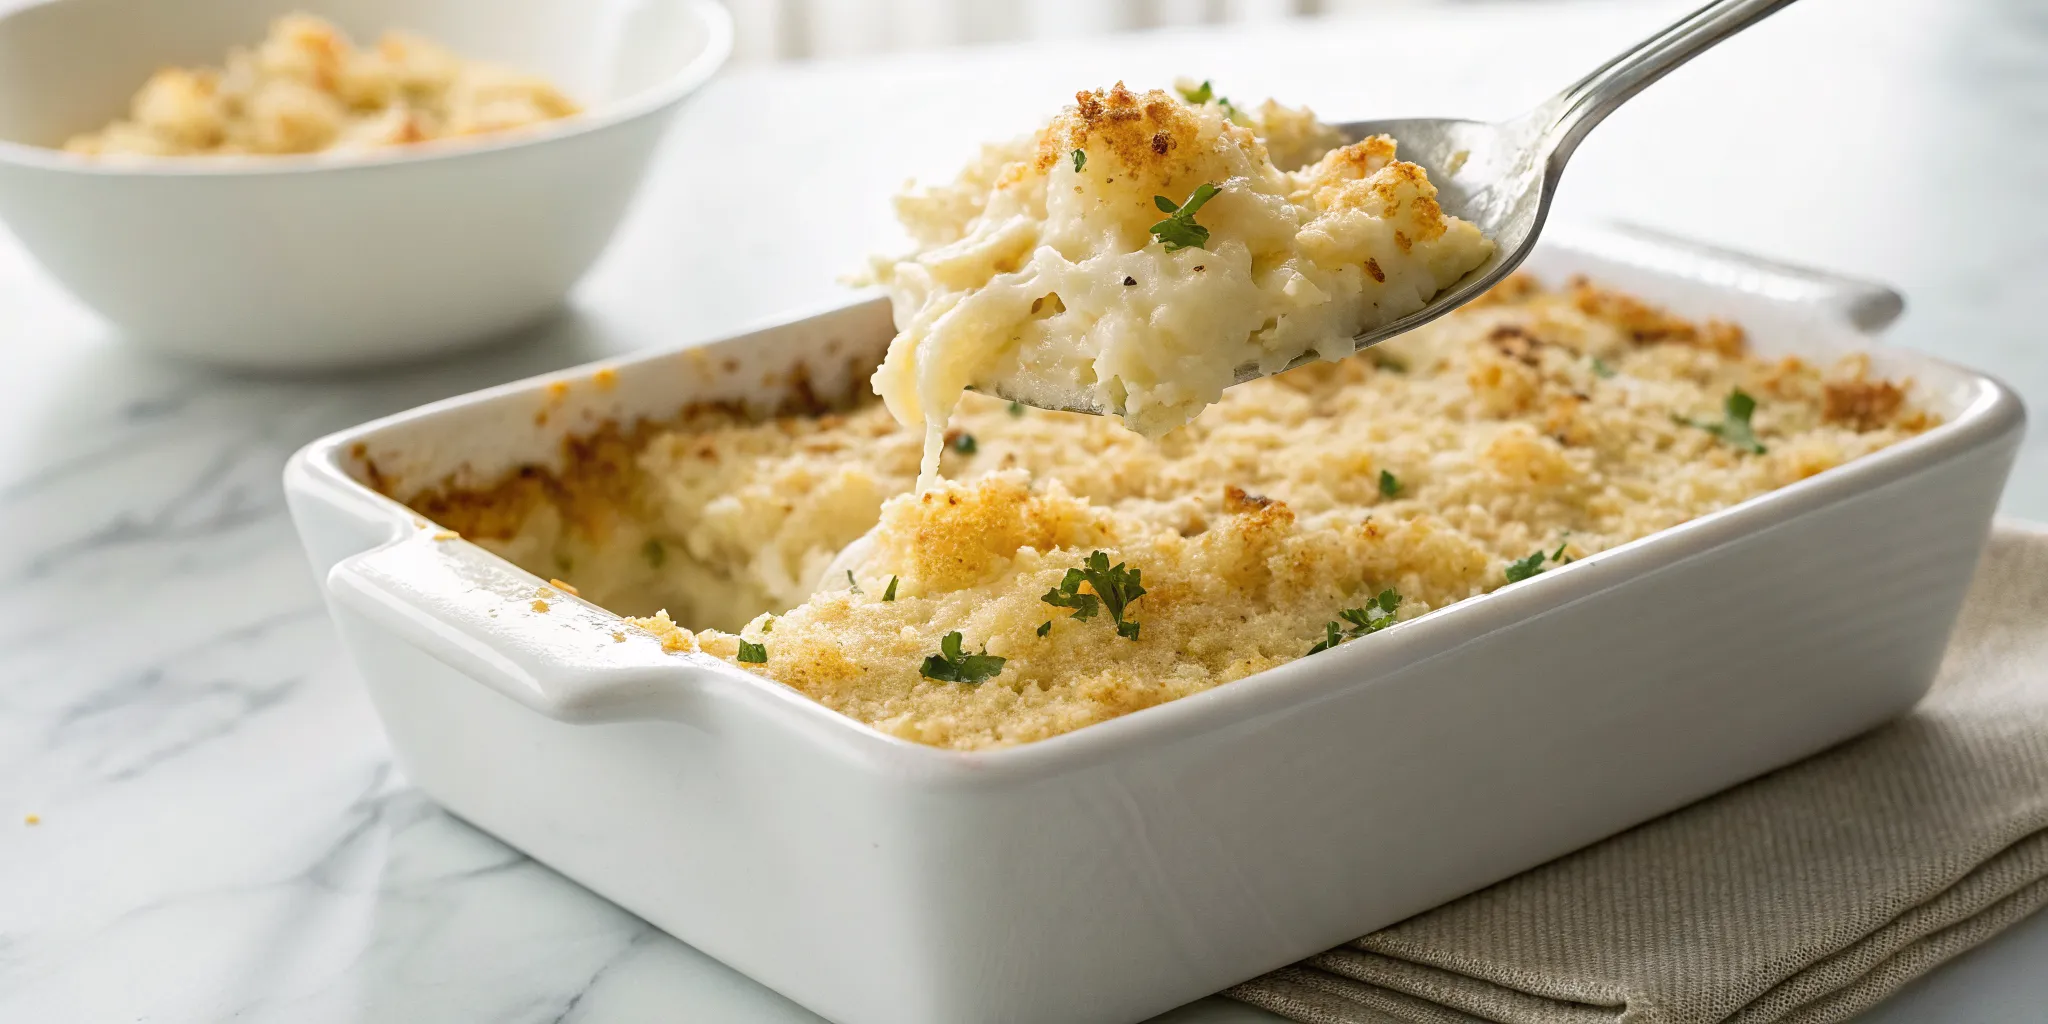
A creamy mac and cheese is wonderful, but a creamy mac and cheese with a crunchy, buttery topping is next-level. This final touch adds a much-needed textural contrast that makes the whole dish more exciting. For the absolute best results, use Panko breadcrumbs. They're lighter and flakier than regular breadcrumbs, which means they bake up into the crispiest, most irresistible topping. Tossing them with a little melted butter before sprinkling them over the top is a non-negotiable step. It ensures they turn a beautiful golden-brown and adds another layer of rich flavor.
What's the Secret to a Creamy Cheese Sauce?
The soul of any baked mac and cheese is its sauce. A truly great cheese sauce is rich, velvety, and clings to every piece of pasta. It’s not about using the most expensive ingredients; it’s about technique. Getting that perfectly smooth texture comes down to a few key steps that are easy to master. By focusing on how you build the sauce from the ground up, you can create a mac and cheese that tastes like it came straight from a Southern kitchen. It all starts with a simple base and ends with a gentle touch.
Start with a Smooth Roux
The foundation of a classic cheese sauce is a perfect roux, a simple paste made from equal parts melted butter and all-purpose flour. This mixture is what will thicken your sauce. To get it right, melt your butter over medium heat, then whisk in the flour until it’s completely smooth. Let it cook for about a minute, stirring constantly. This important step cooks out the raw flour taste without letting the roux get too dark, which would change the flavor. A well-made, lump-free roux is your first step toward achieving that dreamy, velvety texture that makes baked mac and cheese so comforting.
Add Milk Slowly for a Silky Texture
Once your roux is ready, it’s time to turn it into a classic white sauce, also known as a béchamel. The trick here is patience. Instead of dumping all the milk in at once, add it gradually while whisking constantly. Pouring in about a cup of milk at a time allows the roux to absorb the liquid without creating lumps. For an even smoother result, try using warm milk, as it incorporates more easily into the warm roux. Keep whisking until the sauce is smooth and has thickened enough to coat the back of a spoon. This careful process is what creates the silky béchamel sauce that will carry your cheese.
Melt Cheese Off the Heat to Prevent Graininess
This is the step where many cheese sauces go wrong. To keep your sauce from becoming grainy or oily, always remove the pot from the heat before you add the cheese. High heat can cause the proteins in the cheese to tighten up and separate from the fat, which ruins that creamy consistency you’re working so hard to create. Once your white sauce is off the stove, stir in your shredded cheese a handful at a time. Let each addition melt completely before adding the next. This gentle melting process is the final secret to a flawlessly smooth and luscious cheese sauce that will make your mac and cheese unforgettable.
How Do You Get That Perfect Breadcrumb Crunch?
Let’s be honest, the best part of a baked mac and cheese is that golden, crunchy topping. It’s the perfect contrast to the rich, creamy pasta underneath. A soggy topping can ruin the experience, but a perfectly crispy one makes the dish unforgettable. Getting that signature crunch isn’t luck; it’s about using the right ingredients and techniques. From choosing the best breadcrumbs to knowing how to bake them, a few simple steps make all the difference. Here's how to create a breadcrumb topping that’s full of flavor and has that satisfying crunch in every bite.
Panko vs. Regular Breadcrumbs
When you’re at the grocery store, you’ll see two types of breadcrumbs: regular and panko. For the ultimate crunch, always reach for panko. Panko is a Japanese-style breadcrumb made from crustless bread, giving it a light, airy, and flaky texture. Because of this, panko absorbs less oil when baking, resulting in a topping that’s significantly crispier and stays crunchy longer. Regular breadcrumbs are finer and denser, which can create a heavier topping. While they work in a pinch, understanding the difference between breadcrumbs and panko is the first step to mastering that perfect topping.
Use Butter and Seasoning for Extra Flavor
Simply sprinkling dry panko over your mac and cheese won’t cut it. To get that beautiful golden-brown color and rich flavor, you need to toss the breadcrumbs with melted butter first. The butter helps the panko toast evenly and turn wonderfully crisp in the oven. This is also your chance to add another layer of flavor. Don’t be afraid to mix in some seasonings with your buttery breadcrumbs. A little garlic powder, a pinch of smoked paprika, or some dried parsley can add a delicious complexity that complements the cheesy pasta.
Bake Until Golden and Crispy
The final step is the bake, and timing is everything. Since the pasta and cheese sauce are already cooked, the time in the oven is purely for the topping. You want to bake your mac and cheese in a hot oven, around 400°F, for a short amount of time. This high heat crisps the breadcrumbs quickly without overcooking the creamy sauce underneath. Keep a close eye on it; it should only take about 10 to 15 minutes. You’re looking for a deep golden-brown color across the entire surface. Pull it out too early, and it won’t be crunchy. Leave it in too long, and you risk drying out the dish.
How to Assemble and Bake Your Mac and Cheese
Alright, your creamy cheese sauce is ready, and your pasta is cooked. Now it’s time for the final, most exciting part: putting it all together and baking it to golden perfection. This is where you create those delicious layers of flavor and texture that make baked mac and cheese a true comfort food classic. Don’t rush this step. Taking a moment to assemble everything correctly ensures every single bite is as good as the last. From the cheesy pasta base to the crunchy, golden top, getting the assembly right is what separates good mac and cheese from a truly unforgettable one. Let’s walk through how to build your masterpiece.
Layer the Pasta and Cheese Sauce
First, gently fold your cooked macaroni into that velvety cheese sauce, making sure every piece of pasta is completely coated. Once everything is beautifully combined, pour the mixture into your baking dish. A 9x13-inch dish usually works perfectly. Spread it out into an even layer so it bakes uniformly. This simple step is the foundation for a perfectly creamy mac and cheese. Before it heads to the oven, you’ll sprinkle that glorious breadcrumb topping all over the top. This layering technique guarantees a rich, cheesy interior with a satisfyingly crisp crust.
Spread the Breadcrumbs Evenly
The breadcrumb topping is what gives your baked mac and cheese that signature crunch. For the best texture, I highly recommend using panko breadcrumbs. They’re lighter and crispier than regular breadcrumbs and create a fantastic contrast to the creamy sauce below. After you’ve tossed your panko with melted butter and seasonings, sprinkle it evenly over the entire surface of the mac and cheese. Don’t leave any bald spots. A consistent layer ensures that every scoop has that perfect crunchy element. This crispy finish is the 'x-factor' that makes a homemade baked mac and cheese feel extra special.
Get the Baking Temperature and Time Just Right
You’re in the home stretch. To get that perfect golden-brown crust without drying out the creamy sauce, you need to get the oven settings just right. Preheat your oven to 400°F (or 200°C). Bake the mac and cheese for about 10 to 15 minutes. Since everything is already cooked, you’re not trying to cook it through. You’re just heating it up and crisping the top. Keep a close watch on it during the last few minutes. You want the top to be beautifully golden and the sauce to be bubbly around the edges. Pull it out at just the right moment for the ultimate cheesy, crunchy dish.
Common Mac and Cheese Mistakes (and How to Avoid Them)
Making incredible baked mac and cheese is totally achievable, but a few common missteps can stand between you and creamy perfection. The good news is that these mistakes are super easy to fix. By paying attention to a few key details, you can ensure your mac and cheese comes out of the oven bubbly, cheesy, and delicious every single time. Let’s walk through the most frequent slip-ups and how to sidestep them for a flawless finish.
Skip the Pre-Shredded Cheese
I know the bag of pre-shredded cheese is tempting, but please, put it down! This is probably the single most important tip for a silky-smooth cheese sauce. Those convenient shreds are coated in additives like potato starch to keep them from clumping in the bag. Unfortunately, that same coating prevents the cheese from melting properly, leaving you with a grainy, separated sauce. For the creamiest results, always buy a block of cheese and grate it yourself. It only takes a few extra minutes, and the difference it makes to the final texture is absolutely worth it. This simple swap is a true game-changer for any cheese sauce.
Don't Overcook the Pasta or Sauce
It’s easy to get distracted, but keeping a close eye on your pasta and sauce is crucial. First, cook your pasta for about one to two minutes less than the package directions suggest. It should be truly al dente, with a definite bite. Remember, it will continue to cook in the oven, and starting with slightly undercooked pasta prevents it from turning to mush. Second, be careful with your sauce. Once you add the cheese, remove the pan from the heat immediately. Overheating a cheese sauce can cause it to break and become oily. Gently stir the cheese in off the heat until it’s just melted for a perfectly smooth béchamel base.
Avoid Overbaking the Final Dish
Once your mac and cheese is assembled, it’s tempting to think that a longer bake time means a better result, but that’s not the case here. Overbaking is the fastest way to dry out your beautiful, creamy sauce. All the components are already cooked, so the time in the oven is just to heat everything through and get that breadcrumb topping golden and crispy. This usually only takes about 15 to 20 minutes in a hot oven. You’re looking for a bubbly sauce and a toasted top. Pull it out as soon as you see that, and let it rest for a few minutes before serving. This final bit of patience ensures you serve up the best baked macaroni and cheese possible.
Can You Make Baked Mac and Cheese Ahead of Time?
Yes, you absolutely can! Life gets busy, and having a crowd-pleasing dish like baked mac and cheese ready to go is a total game-changer. Whether you're planning for a holiday, a family gathering, or just want to make weeknight dinners a little easier, prepping ahead is the secret. It lets you enjoy a delicious, home-cooked meal without the last-minute stress. Of course, if you'd rather skip the prep altogether, you can always let us handle the cooking and place an order for our classic Southern sides.
But if you're ready to get ahead in your own kitchen, here’s how to do it right so your mac and cheese tastes like you just made it.
How to Prep It in Advance
Planning is everything. You can fully assemble the dish with the pasta and cheese sauce, pour it into your baking dish, cover it, and pop it in the refrigerator for up to two days. When you're ready to eat, just sprinkle on the breadcrumb topping and bake. This method keeps the topping perfectly crisp. If you need even more time, you can prepare the entire dish, breadcrumbs and all, and store it covered in the fridge for up to five days. It’s a fantastic way to get a head start on a big meal.
The Right Way to Store It
For leftovers, let the mac and cheese cool down before storing it. Place it in an airtight container and keep it in the fridge for up to four days. If you’ve made a big batch, you can also freeze it for up to three months. For the best results, try to store the breadcrumb topping separately if you can. This little step helps maintain that signature crunch when you reheat it. Proper storage ensures every bite tastes just as good as the first.
How to Reheat for the Best Results
No one likes dry, leftover mac and cheese. To bring back that creamy, cheesy goodness, you have a couple of great options. The quickest way is the microwave; just be sure to use a medium power setting (around 80%) to warm it gently and prevent the sauce from separating. Alternatively, you can reheat it on the stovetop over low heat. Add a small splash of milk or cream to restore its silky texture, stirring until it's warmed through. This simple trick will make your leftovers taste freshly made.
Mix It Up: Fun Variations and Flavor Ideas
A great baked mac and cheese recipe is like a perfect blank canvas. Once you’ve mastered the classic version, you can start adding your own creative touches to make it uniquely yours. Think of this recipe as your starting point for a dish that can change with your cravings or what you have in the fridge. Whether you’re looking to add some protein, a little spice, or a new cheesy flavor, there are so many simple ways to customize your mac and cheese. Here are a few of my favorite ideas to get you started.
Add Your Favorite Proteins and Veggies
Making your mac and cheese a full meal is as easy as adding some protein and veggies. For a true Southern-style dish, try mixing in some pulled pork, crispy bacon, or even some chopped fried chicken. If you want to add some greens, roasted broccoli, sautéed mushrooms, or caramelized onions blend in beautifully with the creamy sauce. Just make sure whatever you add is cooked beforehand. You can simply stir your additions into the cheese sauce along with the pasta before pouring everything into the baking dish. This is a fantastic way to create a hearty one-pan dinner that the whole family will love.
Experiment with Different Spices and Herbs
Don’t underestimate the power of a few simple seasonings. The right spices can add incredible depth and warmth to your cheese sauce. A pinch of smoked paprika will give it a lovely color and a subtle smoky flavor, while a dash of cayenne pepper can add a gentle kick of heat. Mustard powder is another classic addition that actually enhances the cheesy flavor. If you have fresh herbs on hand, chopped chives or thyme are wonderful stirred in at the end. Feel free to play around with a spice blend to find what you like best. It’s an easy step that makes a huge difference.
Try New Cheese Combinations
While sharp cheddar is the go-to for a reason, exploring different cheese combinations is where the real fun begins. The key is to use a mix of cheeses for the best flavor and texture. You want a good melting cheese for creaminess and a more flavorful, aged cheese for a savory punch. Gruyère adds a wonderful nutty flavor, while smoked Gouda can make the whole dish taste richer. For an extra gooey cheese pull, try mixing in some Monterey Jack or mozzarella. A guide to melting cheeses can help you find the perfect partners for your cheddar base. Don’t be afraid to get creative and find your signature blend.
How to Serve and Store Your Masterpiece
You’ve created a beautiful, bubbly, and cheesy dish. Now it’s time for the best part: eating it! Here’s how to serve your mac and cheese for the perfect meal and what to do with any delicious leftovers.
Find the Perfect Side Dishes
This creamy baked mac and cheese is hearty enough to be the main event, especially with a simple green salad on the side. But if you’re serving it as a side dish, it pairs beautifully with classic Southern comfort foods. Think of it alongside crispy fried chicken, slow-cooked collard greens, or pulled pork. For inspiration on building the perfect plate, you can always check out our full menu of Southern favorites. And don't forget a side of garlic bread; it’s perfect for scooping up every last bit of that incredible cheese sauce.
Tips for Storing and Enjoying Leftovers
If you have any mac and cheese left, store it in an airtight container in the refrigerator for up to four days. When you're ready for another round, the best way to reheat it is on the stovetop over low heat with a small splash of milk. This helps bring back its original creaminess without drying it out. You can also use the microwave, but try to avoid the oven, which can make the sauce separate.
Want to prepare it ahead of time? You can assemble the entire dish (minus the breadcrumbs) up to two days in advance. Just cover and refrigerate it. When you’re ready to eat, add the breadcrumb topping and bake as directed.
Related Articles
- Old Fashioned Baked Mac and Cheese Recipe Guide | Notch8 Carolina Kitchen
- Perfectly Creamy Baked Mac and Cheese for 2 — Notch8 Carolina Kitchen
- The Perfect Southern Style Mac and Cheese Recipe — Notch8 Carolina Kitchen
Frequently Asked Questions
Why did my cheese sauce turn out grainy instead of smooth? This usually happens for one of two reasons. The most common culprit is using pre-shredded cheese, which has additives that prevent it from melting into a silky sauce. Always grate your own cheese from a block. The other reason is adding the cheese while the sauce is still over direct, high heat. This can cause the cheese to separate. Always take your pot off the stove before stirring in the cheese for a perfectly velvety result.
Can I use a different type of pasta besides elbow macaroni? Absolutely. While elbow macaroni is a classic, any short pasta with plenty of texture will work great. Shapes like penne, cavatappi, or even shells are excellent choices because their ridges and hollows are perfect for catching all of that delicious cheese sauce. The main goal is to use a sturdy pasta that can hold its own during baking without becoming too soft.
What's the best way to reheat leftovers without them getting dry? The key to reviving leftover mac and cheese is adding a little moisture back into it. The best method is to warm it up in a saucepan over low heat. Add a splash of milk or cream and stir gently until it's heated through. This will help restore the sauce to its original creamy consistency. Using the microwave can work in a pinch, but the stovetop method gives you the best results.
I want to make this for a party. Can I prepare it in advance? Yes, this dish is perfect for making ahead. You can assemble the entire casserole, with the pasta and cheese sauce mixed together in the baking dish, up to two days beforehand. Just cover it tightly and keep it in the refrigerator. For the best results, wait to add the buttery breadcrumb topping until right before you put it in the oven. This ensures the topping stays perfectly crisp.
My breadcrumb topping never seems to get very crunchy. What's the secret? For a truly crispy topping, two things are essential. First, always choose panko breadcrumbs over regular ones; their light, flaky texture creates a much better crunch. Second, don't just sprinkle them on dry. Tossing the panko with a generous amount of melted butter before spreading it over the pasta is a non-negotiable step. The butter helps the breadcrumbs toast to a beautiful golden-brown and gives them that irresistible, crunchy finish.