
Old Fashioned Banana Pudding With Condensed Milk Recipe
What separates a decent banana pudding from a truly spectacular one? It’s not the bananas or even the wafers. The secret is in the custard’s rich, velvety texture and deep, sweet flavor that you just can’t get from a box mix. That unforgettable quality comes from one key ingredient that has been the cornerstone of this dessert for generations. We’re talking about the magic that happens when you create an old fashioned homemade banana pudding with condensed milk. It creates a luscious, creamy base that perfectly balances the fresh fruit and soft cookies. This recipe is your guide to achieving that signature taste and texture every single time.
Key Takeaways
- Choose your ingredients wisely: An authentic, old-fashioned pudding relies on sweetened condensed milk for its signature rich and creamy texture. For the bananas, pick ones that are ripe enough for sweetness but still firm enough to hold their shape when sliced.
- Technique is everything for texture: To get a perfectly smooth, lump-free custard, always whisk your dry ingredients together before adding the milk and eggs. When assembling, create even layers to protect the bananas and ensure every spoonful has the right balance.
- Don't rush the chilling process: Patience is key. Letting your pudding rest in the fridge for at least a few hours, or preferably overnight, is an essential step that allows the flavors to deepen and the wafers to soften into that perfect cake-like consistency.
Why Is Old-Fashioned Banana Pudding a Southern Staple?
If you grew up in the South, you know that banana pudding isn't just a dessert; it's a feeling. It’s the star of the show at family reunions, church potlucks, and Sunday dinners. This classic dish brings everyone together with its comforting layers of creamy pudding, sweet bananas, and soft vanilla wafers. It’s a taste of nostalgia that reminds us of simpler times and shared moments around the table.
What makes it such an enduring favorite? It’s the perfect balance of simple ingredients coming together to create something truly special. Each spoonful is a delightful mix of textures and flavors that feels both indulgent and familiar. It’s the kind of Southern comfort food that warms you from the inside out, and its presence on a dessert table is practically a requirement for any true Southern gathering. This dessert is more than just a recipe; it’s a tradition passed down through generations, with every family adding its own little twist. The beauty of banana pudding is its accessibility. The ingredients are straightforward and easy to find, yet the final product feels like a luxurious treat. It’s a testament to how Southern cooking can take humble components and turn them into something extraordinary.
The Sweet Secret: Condensed Milk
The key to that unbelievably rich and creamy texture you find in a truly great banana pudding lies in one simple ingredient: sweetened condensed milk. This isn't your average milk. It’s thick, sweet, and has a decadent, almost caramel-like flavor that instant pudding mixes just can't replicate. Using condensed milk creates a sweet, layered dessert that is velvety smooth and perfectly balanced. It’s the ingredient that takes the pudding from good to absolutely unforgettable, giving it that signature old-fashioned taste that we all know and love. It’s the secret that grandmas have been using for decades.
Why Homemade Always Wins
While a boxed mix might seem convenient, there’s no substitute for the real thing. When it comes to banana pudding, homemade always comes out on top. The process of making the pudding from scratch results in a much richer flavor and a luxuriously creamy consistency that you just can’t get from a powder. Plus, when you make it yourself, you control the quality. Using fresh, ripe bananas and a from-scratch custard ensures every bite is packed with authentic flavor. This commitment to quality ingredients is what makes a homemade dessert, or any dish for that matter, truly stand out.
Gather Your Ingredients for the Perfect Pudding
Before you even think about pulling out a mixing bowl, let's talk ingredients. The secret to a truly memorable banana pudding isn't just in the method; it's in the quality of what you put into it. Getting these details right from the start is what separates a good pudding from a great one. Think of it as setting the stage for a perfect performance. We’ll walk through the key players: the creamy base, the perfect fruit and wafers, and the secrets to a flawless custard.
The Creamy Condensed Milk Base
The heart and soul of this old-fashioned recipe is sweetened condensed milk. It’s the non-negotiable ingredient that gives the pudding its signature rich, creamy texture and decadent sweetness. This isn't the place for substitutions. Using condensed milk is what makes this a true Southern-style banana pudding, creating a luscious base that perfectly complements the fresh bananas and vanilla wafers. It’s the sweet, velvety foundation that holds all the other flavors together, turning a simple dessert into pure comfort in a bowl.
Pick the Best Bananas and Wafers
Your choice of bananas can make or break your pudding. You're looking for that sweet spot: ripe enough for flavor but firm enough to hold their shape. The ideal banana is mostly yellow with a few brown spots. This ensures they’re sweet without turning into mush when layered. As one recipe notes, you should "use bananas that are ripe (slightly yellow with a few brown spots) but still firm." And don't forget the wafers. A classic, sturdy vanilla wafer is essential. It provides that satisfying crunch and soaks up the custard just enough without falling apart completely.
Tips for a Silky-Smooth Custard
A lumpy custard is a banana pudding tragedy, but it’s one you can easily avoid. The key is in the technique. To get that silky-smooth texture, a classic old-fashioned banana pudding recipe suggests you "mix flour and salt first, then slowly add milks and egg yolks, stirring constantly over medium heat until the mixture thickens." Constant stirring is your best friend here, so don’t walk away from the stove. For a fun twist that also adds flavor, you can even use crushed Nilla wafers instead of flour to thicken the pudding. This little trick infuses an extra layer of vanilla right into the custard itself.
Our Step-by-Step Guide to Homemade Banana Pudding
Ready to bring this Southern classic to life in your own kitchen? It's easier than you might think. We'll walk you through every step, from cooking the creamiest custard to layering it all together for that picture-perfect finish. This is where the magic happens, and soon you'll have a dessert that tastes just like home. Let's get started.
Whip Up the Perfect Custard
First things first, let's make that dreamy custard. In a medium saucepan, whisk together your flour and salt. Slowly pour in the condensed milk, evaporated milk, and water, stirring until everything is smooth. Now, add your lightly beaten egg yolks. Place the saucepan over medium heat and get ready to stir. You'll want to stir constantly for about seven to eight minutes, or until the mixture is nice and thick. Once it's thickened, remove it from the heat and stir in a splash of vanilla extract. This stovetop method is the secret to a perfectly smooth custard every single time.
Layer It Like a Pro
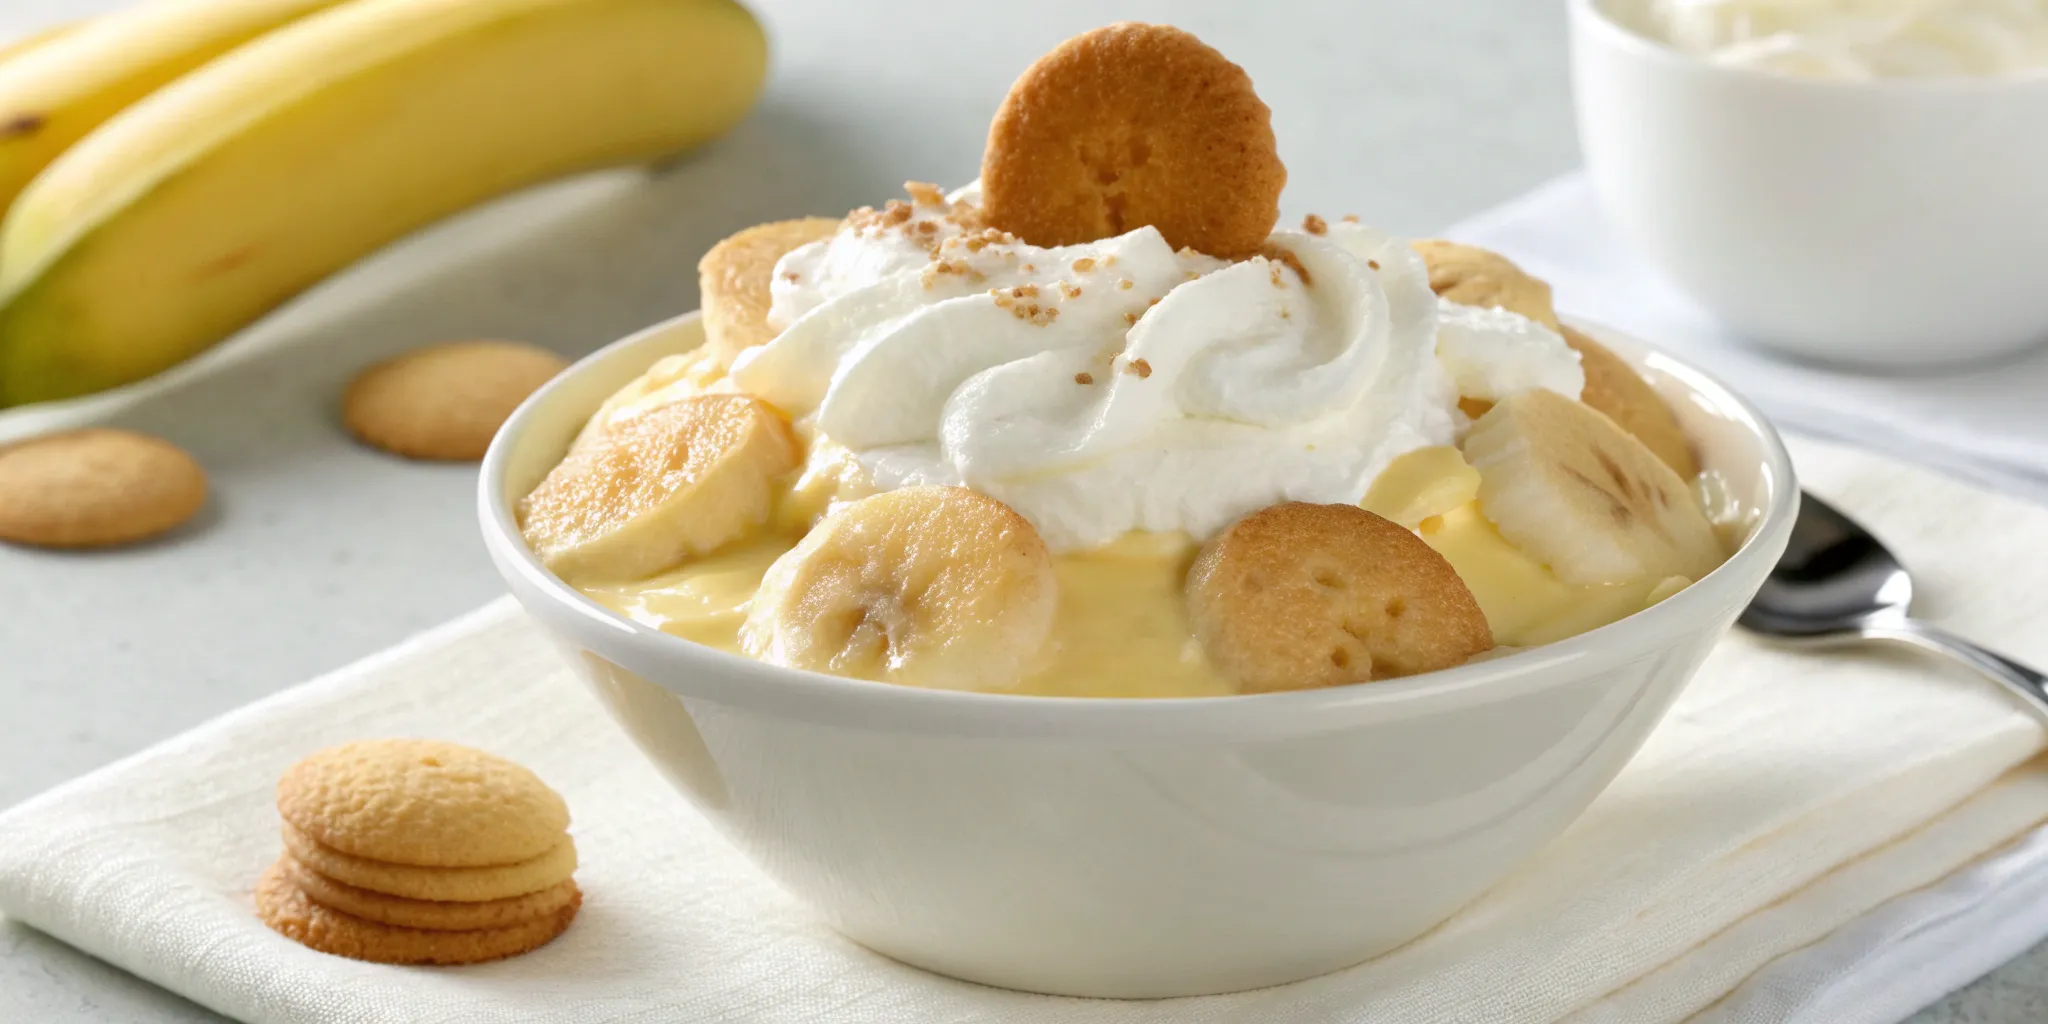
With your custard ready and smelling amazing, it's time for the fun part: assembly. Grab a 2-quart baking dish or a trifle bowl if you're feeling fancy. Start by arranging a single layer of vanilla wafers on the bottom, followed by a layer of sliced bananas. Then, pour about one-third of your warm custard over the top, spreading it evenly. Repeat these layers two more times, ending with a final layer of custard. Taking your time to create even layers is what makes every spoonful a perfect combination of wafer, banana, and cream. It’s a simple technique that makes all the difference.
Add Your Finishing Touches
The final step is all about that beautiful topping. You have two classic options here. For a traditional baked pudding, you can whip up a fluffy meringue. Spread it carefully over the top of the pudding, making sure the meringue touches the edges of the dish. This little trick helps prevent it from shrinking while it bakes to a gorgeous golden brown. If you prefer a no-bake dessert or just love whipped cream, you can chill the pudding and top it with a generous layer of fresh, sweetened whipped cream right before serving. Either way, you can't go wrong.
How to Keep Bananas from Turning Brown
We’ve all seen it happen. You make a beautiful, creamy banana pudding, but a few hours later, those perfect banana slices start to look a little sad and brown. It’s a completely natural process, but it can take away from the dessert’s appeal. The good news is that keeping your bananas fresh and yellow is easier than you think. It just takes a little planning and a couple of simple tricks to protect the fruit from exposure to air, which is what causes them to brown. With these tips, your banana pudding will look just as good as it tastes, even the next day.
The Right Timing and a Touch of Citrus
The key to preventing brown bananas is to limit their contact with air. When you assemble your pudding, tuck the banana slices snugly between layers of custard and wafers. This simple step creates a physical barrier that shields the fruit. For extra protection, you can use a classic baker’s trick: a little bit of citrus. The ascorbic acid in citrus juice slows down the browning process. Gently toss your banana slices in a tiny amount of lemon, orange, or even pineapple juice before layering them into your pudding. You only need a light coating, not enough to change the flavor of your dessert.
Use Layers to Protect the Fruit
Think of your pudding and wafers as a cozy blanket for your bananas. As you build your dessert, make sure each layer of bananas is completely covered by a generous layer of custard. This not only protects the fruit but also helps all the flavors meld together perfectly. When you’re done, press a piece of plastic wrap directly onto the surface of the pudding before putting the lid on your container. This minimizes air contact and helps maintain that fresh-made look and taste. Storing your pudding in an airtight container in the fridge is the final step to keeping every spoonful vibrant and delicious, just like the Southern classics on our menu.
Get the Perfect Flavor and Texture Every Time
Making a truly memorable banana pudding comes down to the details. It’s about understanding the little techniques that turn a good dessert into a great one. From the creaminess of the custard to the perfect blend of flavors, getting the texture and taste just right is what makes this Southern classic so special. Here are a few key tips that will help you achieve pudding perfection every time.
How to Make Lump-Free Custard
We’ve all been there: you’re so close to the finish line, and you find lumps in your custard. It’s frustrating but completely avoidable. The secret is in the setup. Before turning on the heat, whisk your flour and salt together. This simple step prevents clumps from forming. Then, slowly pour in the milk and egg yolks, stirring constantly over medium heat for about 7-8 minutes until the mixture is beautifully thick. Once it’s done, take it off the heat and stir in the vanilla. This old-fashioned method ensures a silky-smooth base for your pudding.
Why Chilling Time Matters
I know it’s tempting to dig into your banana pudding right away, but patience is your best friend here. Chilling the pudding isn’t just about making it cold; it’s a crucial step where the magic happens. Giving it at least a few hours in the fridge allows the custard to set properly. Even better, chilling it overnight lets all the flavors meld together. The vanilla wafers soften to a perfect cake-like texture, and the banana flavor infuses the entire dessert. This resting period is what creates that deep, cohesive taste that makes homemade banana pudding so comforting and delicious.
Prep Your Ingredients for Success
A great banana pudding starts before you start mixing. Taking a few minutes to prep your ingredients properly sets the foundation for a flawless dessert. For the bananas, look for ones that are yellow with a few brown spots. This means they’re sweet but still firm enough to hold their shape without turning to mush. If your recipe includes cream cheese, make sure it’s completely softened to room temperature. Trying to whip cold cream cheese is a guaranteed way to get lumps. Getting everything ready beforehand makes the assembly process smooth, ensuring you get the best banana pudding possible.
Avoid These Common Banana Pudding Mistakes
Making banana pudding is a labor of love, but a few simple missteps can stand between you and dessert perfection. We’ve all been there. Maybe the texture was a little off, or the flavors just didn’t pop. The good news is that these common mistakes are easy to fix. With a little attention to your ingredients, assembly, and timing, you can create a classic Southern banana pudding that tastes just like you remember. Let’s walk through a few key things to watch out for.
Using the Wrong Ingredients
The foundation of a great banana pudding starts with your shopping list. First, make sure your cream cheese is completely softened to room temperature. If it’s even a little bit cold, it won’t blend smoothly, leaving you with a lumpy custard. Another key is to use sweetened condensed milk, not evaporated milk. They look similar, but they are not interchangeable. Sweetened condensed milk provides the rich, sweet, and creamy texture essential for an old-fashioned pudding. Using evaporated milk will result in a dessert that’s less sweet and has a much thinner consistency.
Layering and Assembly Errors
How you assemble your pudding is just as important as what’s in it. The goal is to get a perfect combination of creamy pudding, sweet bananas, and soft wafers in every bite. To do this, focus on creating neat, even layers. A proper layering technique ensures that no single ingredient overpowers the others and also makes for a beautiful presentation. Don’t be afraid to gently press down on the wafers to create a solid base for each layer. For a final touch of texture, try sprinkling some extra crushed wafers over the top right before you serve it.
Not Chilling It Long Enough
I know how hard it is to wait, but patience is a virtue when it comes to banana pudding. This dessert needs time for all the components to come together. The chilling period allows the wafers to soften into a delicious, cake-like texture and gives the flavors time to meld. Rushing this step can leave you with crunchy wafers and a pudding that hasn’t fully set. For the best possible flavor and texture, you need to let it chill in the refrigerator overnight. If you can wait a full 24 hours, that’s even better.
Ready for a Twist? Try These Variations
While the classic old-fashioned banana pudding holds a special place in our hearts, sometimes it’s fun to play with your food. The beauty of this dessert is its versatility. A few simple additions or swaps can transform it into something new and exciting, perfect for surprising guests or just satisfying a specific craving. Think of the original recipe as your canvas. These variations are here to inspire you, whether you’re in the mood for something rich and decadent, light and tropical, or need to accommodate a specific dietary preference.
Add Chocolate or Peanut Butter
If you’re a fan of rich, indulgent desserts, this one’s for you. Adding chocolate or peanut butter to your banana pudding is a game-changer. For a simple twist, try folding mini chocolate chips into the custard before layering. You could also create a separate layer of chocolate pudding for a beautiful striped effect. For peanut butter lovers, gently swirl a half-cup of creamy peanut butter into the custard while it’s still warm. The combination of banana, vanilla, and rich chocolate or nutty peanut butter is absolutely heavenly and adds a new level of comfort to this classic dish.
Give It a Tropical Vibe
Want to give your Southern staple a sunny, island-inspired makeover? It’s easier than you think. Simply add a tropical fruit or some toasted coconut to the mix. You can layer in thin slices of fresh pineapple or mango alongside the bananas for a bright, tangy contrast to the sweet custard. For a delightful crunch and nutty flavor, sprinkle a generous amount of toasted coconut flakes between each layer. This version is light, refreshing, and perfect for a summer get-together, bringing a little taste of the tropics right here to the Carolinas.
Simple Swaps for Different Diets
Everyone deserves to enjoy a good banana pudding. With a few easy substitutions, you can make this dessert friendly for different dietary needs without sacrificing flavor. To make it gluten-free, simply swap the traditional vanilla wafers for a gluten-free variety. For a dairy-free version, use dairy-free condensed milk and a plant-based milk like almond or oat milk in your custard. If you're watching your sugar intake, you can use a sugar-free pudding mix and a sugar substitute in the custard. These simple changes ensure everyone at the table can have a scoop.
How to Store and Make Your Pudding Ahead of Time
One of the best things about old-fashioned banana pudding is that it’s a perfect make-ahead dessert. In fact, it actually gets better with a little time in the refrigerator. Giving the pudding a chance to chill allows the vanilla wafers to soften and all the creamy, sweet flavors to meld together beautifully. This makes it an ideal, stress-free dessert for family dinners, potlucks, or any time you want to have a classic Southern treat ready to go. Think of it this way: the time in the fridge isn't just for chilling; it's an essential part of the recipe where the magic happens. The custard firms up, the bananas infuse their flavor throughout, and the vanilla wafers transform from crunchy cookies into soft, cake-like layers that melt in your mouth. Rushing this step is one of the biggest mistakes you can make. So, if you’re getting ready for a gathering or just want to have a delicious dessert waiting for you, here’s everything you need to know about storing and prepping your banana pudding in advance. We'll cover how long it stays fresh, the ideal time to make it, and how to serve it perfectly every time. And if you find yourself short on time and craving that authentic taste without the wait, you can always visit us at Notch8 for a taste of our classic Southern comfort food.
Keep It Fresh for Days
Once your banana pudding is assembled, the key to keeping it delicious is proper storage. Cover the dish tightly with plastic wrap, pressing it directly onto the surface of the pudding to prevent a skin from forming. Store it in the refrigerator, and it will stay fresh for up to three days. While it’s still tasty on day three, I find that this pudding is at its absolute best within the first 48 hours. After that, the bananas can start to get a bit too soft and the wafers can become mushy. For the ideal texture and flavor, plan to enjoy it within a day or two.
Tips for Prepping in Advance
This dessert is a fantastic choice to prepare a day before you plan to serve it. Making it ahead of time isn’t just a time-saver; it’s my secret to the best-tasting banana pudding. An overnight chill gives the custard time to fully set and allows the vanilla wafers to absorb the moisture and flavor from the pudding, transforming them into soft, cake-like layers. This resting period is what creates that signature texture everyone loves. Simply assemble the pudding, cover it, and pop it in the fridge. When you’re ready for dessert the next day, all you have to do is serve and enjoy.
How to Refrigerate and Serve Later
Chilling your banana pudding is a non-negotiable step. After you’ve layered all your ingredients, cover the dish and place it in the refrigerator for at least two hours, though four hours is even better. This chilling time is essential for the pudding to thicken and set properly. It’s also what helps the wafers get perfectly soft. If you’re planning to add a whipped cream topping, I recommend waiting to add it until just before serving. This ensures the whipped cream is fresh, fluffy, and looks its best. Serve the pudding cold, straight from the fridge, for that classic, refreshing taste.
Related Articles
- The Best Southern Banana Pudding Recipe (Easy & Classic)
- The Best Old Fashioned Banana Pudding with Condensed Milk
Frequently Asked Questions
Is it really necessary to use sweetened condensed milk? Yes, for that authentic, old-fashioned flavor and texture, it's a must. Sweetened condensed milk is what gives the pudding its signature rich, velvety consistency and deep sweetness that you just can't get from regular milk and sugar. Using a substitute like evaporated milk will give you a much thinner and less decadent result.
How can I tell when my custard is thick enough on the stove? While stirring for about seven to eight minutes is a great guideline, the best way to check is with a spoon. The custard is ready when it's thick enough to coat the back of the spoon. If you can draw a line through the custard on the spoon with your finger and the line holds its shape, it's perfect.
Can I use overripe, brown bananas to make pudding? It's best to save those very ripe bananas for banana bread. For pudding, you want bananas that are sweet but still firm enough to hold their shape when sliced and layered. Look for bananas that are mostly yellow with just a few brown spots. Using overripe bananas can result in a mushy texture and an overly sweet dessert.
My wafers always get too soggy. What am I doing wrong? The wafers are meant to soften to a cake-like consistency, but they shouldn't turn to complete mush. This usually happens when the pudding hasn't been chilled long enough. An overnight chill is crucial because it allows the custard to set properly, so the wafers absorb just the right amount of moisture without becoming waterlogged.
Can I freeze leftover banana pudding? I wouldn't recommend it. Freezing can drastically change the texture of both the custard and the bananas. When it thaws, the pudding often becomes watery and the bananas can get quite mushy. This dessert is definitely at its best when enjoyed fresh from the refrigerator within three days.