
Southern Collard Greens Recipe with Bacon & Brown Sugar
Let’s be honest, we’ve all had a disappointing bite of collard greens. Maybe they were too bitter, tough to chew, or worse, gritty. It’s a common problem that can make cooking them at home feel intimidating. But what if I told you that silky, tender, and deeply flavorful greens are completely achievable in your own kitchen? The secret isn’t complicated; it’s about the right technique and a balanced flavor profile. This guide will walk you through every step, from picking the best bunch to getting the seasoning just right. We’ll share the perfect collard greens recipe with bacon and brown sugar to guarantee a flawless pot every single time.
Key Takeaways
- Proper prep is the foundation for great greens: Start by washing your leaves several times to remove any hidden grit. Then, be sure to remove the tough stems before chopping to guarantee a perfectly tender texture in every bite.
- A low and slow simmer is essential for tenderness: Don't rush the cooking process. The key to perfectly tender greens is letting them simmer on low heat for at least three hours, giving the tough leaves plenty of time to soften and absorb flavor.
- Layer your flavors for a balanced taste: Start with a rich base of rendered bacon fat and a savory broth. Finish the dish by balancing the flavors with a splash of apple cider vinegar for tang, a touch of brown sugar for sweetness, and a little spice for heat.
What Makes Collard Greens a Southern Staple?
If you’ve ever sat down for a true Southern meal, you know collard greens are non-negotiable. They’re more than just a side dish; they’re a tradition passed down through generations, a fixture at family gatherings and Sunday dinners. What makes them so special is the way they’re prepared. This isn't a quick sauté. Southern collards are simmered low and slow, a classic "soul food" dish often featuring smoky bacon and a touch of brown sugar to balance out their natural bitterness. This slow-cooking method transforms the tough leaves into something incredibly tender and flavorful, a process that can't be rushed.
The aroma alone can transport you back to your grandmother's kitchen. It’s the kind of food that feels like a warm hug, comforting and deeply satisfying. At Notch8, we honor that tradition by preparing our collards with the same care and patience, ensuring every bite tastes like home. It’s this commitment to authentic flavor that makes collard greens a beloved staple on our menu and on tables all across the South.
Collards vs. Other Greens: What's the Difference?
Walking through the produce aisle, it’s easy to get collards mixed up with their leafy green cousins like kale or mustard greens. While they share some similarities, collard greens have a unique personality. As a dark, leafy vegetable from the cabbage family, collards have large, sturdy leaves and a slightly bitter taste that sets them apart.
Unlike more delicate greens, their robust texture holds up beautifully to long cooking times. This is their superpower. Instead of turning to mush, they become silky and tender while soaking up all the delicious flavors from the pot, whether it's smoky bacon fat, savory broth, or a hint of spice. This makes them the perfect canvas for the rich, complex flavors that define Southern cooking.
More Than Just Delicious: The Health Perks
While we love collard greens for their incredible flavor, it doesn't hurt that they're also really good for you. It’s a wonderful bonus when a comfort food classic also comes with a list of health benefits. Collard greens are absolutely packed with vitamins, minerals, and fiber, making them a powerhouse of nutrition.
They’re a great source of vitamins A, C, and K, and they provide a healthy dose of calcium and iron. So, while you’re enjoying that perfectly tender, flavorful bite, you’re also giving your body a lot of what it needs to thrive. It’s one of the best examples of how traditional Southern cooking uses simple, fresh ingredients to create dishes that are both nourishing and delicious.
Your Shopping List for Bacon Brown Sugar Collards
Great collard greens start with great ingredients. You don’t need a long, complicated list to create that classic Southern flavor we all love. The magic is in picking the right items and knowing how they work together. A quick trip to the store for a few key essentials will set you up for success. This simple shopping list is the foundation for a pot of greens that tastes like home. From the freshest leaves to the perfect bacon, getting these details right is the first step toward a truly memorable side dish.
How to Pick the Best Bunch of Greens
Your journey to perfect collards begins in the produce aisle. When you’re standing before a pile of greens, you want to choose fresh, vibrant leaves. Look for bunches with a deep green color and leaves that feel sturdy, not flimsy. The stems should be firm and crisp. Avoid any bunches with yellowing spots or wilted edges, as these are signs the greens are past their prime and won't give you the best flavor or texture. Freshness is everything, so take a moment to pick the best of the bunch.
Find the Right Bacon for the Job
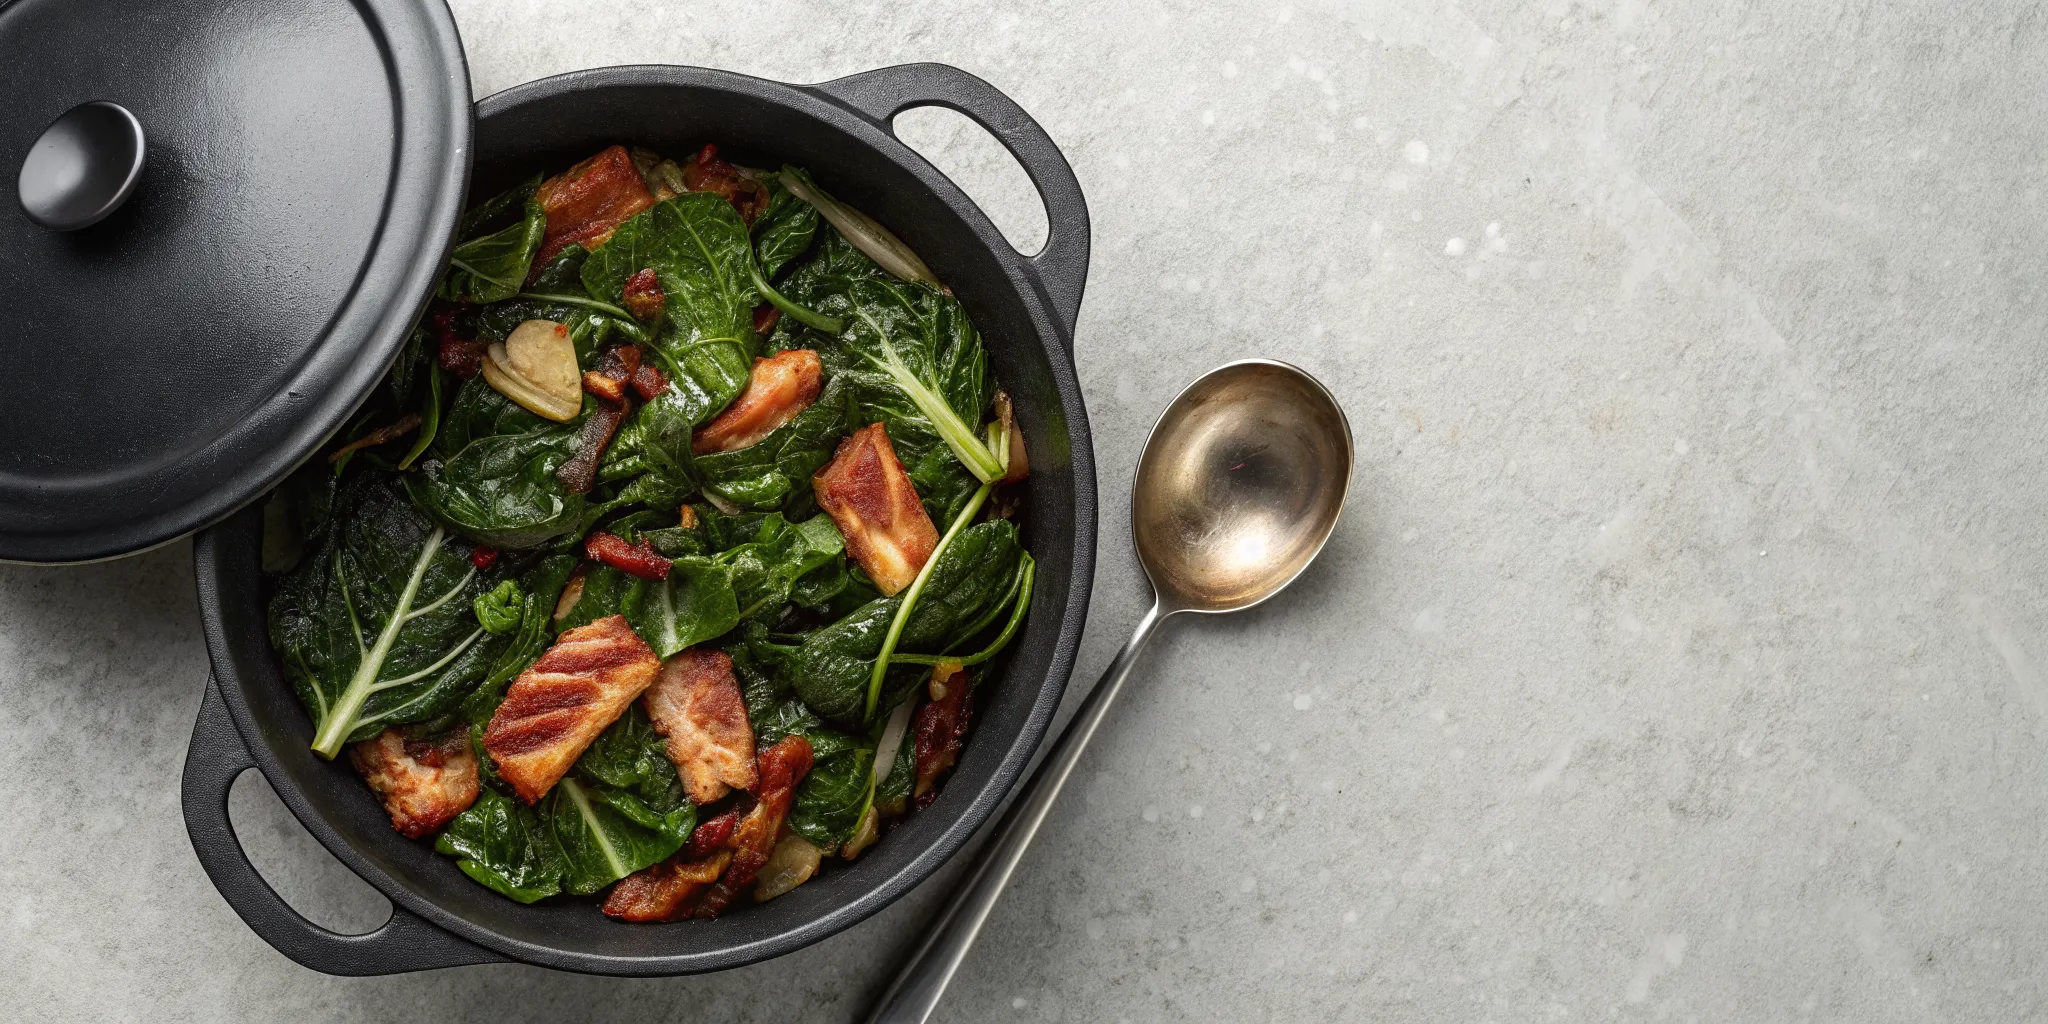
Bacon does more than just add a salty, smoky bite; it creates the flavorful foundation for the entire dish. The secret is to cook the collards in pork fat, specifically the grease left after you’ve crisped up the bacon. This is non-negotiable for authentic flavor. I recommend a good quality, thick-cut smoked bacon. It renders beautifully, leaving you with plenty of delicious fat to wilt your greens in. Frying the bacon first gives you a crispy garnish and infuses every leaf with that rich, savory taste.
The Secret Spices and Sweeteners
Now for the fun part: balancing the flavors. Collard greens have a natural, slightly bitter taste, but the right seasonings turn them into something special. A splash of apple cider vinegar is essential for cutting through that bitterness and brightening the dish. Then comes the brown sugar. It does more than add sweetness; it brings a deep, molasses-like richness that complements the smoky bacon. This recipe for Southern Collard Greens w/ Bacon & Brown Sugar shows how well these flavors meld. This simple trio is all you need for a perfectly balanced pot of greens.
How to Prep Your Greens Like a Pro
Before you even think about turning on the stove, let's talk about the most important step for amazing collard greens: the prep work. I know, it’s not the most glamorous part, but trust me, taking a few extra minutes here makes all the difference between gritty, tough greens and the silky, tender ones you dream about. Getting your collards perfectly clean and properly chopped is the foundation of a truly great Southern dish. It’s a simple process that sets you up for success and ensures every bite is pure comfort.
Think of it as a little ritual. Put on some good music, clear your counter, and get ready to transform that beautiful bunch of greens into something special. We’ll walk through the two key steps together: getting them squeaky clean and then breaking them down for the perfect texture. Once you get the hang of it, you’ll be able to prep a big batch of greens like a seasoned pro, ready for any potluck or family dinner.
Wash and Clean Your Greens Thoroughly
There’s nothing worse than taking a bite of delicious-looking greens only to get a mouthful of grit. Since collards often grow in sandy soil, this step is non-negotiable. The key is to soak and rinse them several times until the water is completely clear. Fill your kitchen sink with cold water, submerge the leaves, and swish them around to loosen any dirt. Let them sit for a few minutes so the sand can sink to the bottom. Then, lift the greens out of the water rather than draining it, which just pours the grit right back over them. Repeat this process until you see no more dirt at the bottom of the sink. It’s a small detail that makes a huge impact on your final dish.
De-Stem and Chop for the Best Texture
Collard green stems are tough and fibrous, and they won’t break down as nicely as the leaves. Removing them is essential for that perfect, melt-in-your-mouth texture. For large leaves, a great method is to lay one flat and carefully slice along both sides of the thick center stem. For a quicker approach, you can fold the leaf in half lengthwise and slice the stem off in one go. Once the stems are removed, stack a few leaves on top of each other, roll them up tightly like a cigar, and slice them into ribbons. This simple technique helps the greens cook evenly and creates a beautiful texture in the final dish.
Our Step-by-Step Recipe for Perfect Collard Greens
Alright, let's get cooking! Making truly great collard greens isn't complicated, but it does require a little love and patience. The secret is all in how you build the flavors from the ground up. We're going to walk you through the simple process we use to get that perfect, soulful pot of greens every single time. Forget tough, bitter greens; we're aiming for tender, savory, and just a little bit sweet. This is the kind of side dish that threatens to steal the show. Ready to make some magic? Grab your biggest pot, and let's get started.
Start with a Flavorful Bacon Base
Every great pot of collards begins with a rich and savory base, and for us, that means bacon. Start by rendering down some thick-cut bacon in your pot until it’s nice and crispy. This step does two wonderful things: it gives you delicious bacon bits to stir in later and creates a flavorful foundation of rendered fat to cook everything else in. For even more depth, we love adding smoked turkey wings or necks to the pot. A touch of brown sugar here also works wonders, adding a subtle sweetness that cuts through the bitterness of the greens and balances the saltiness of the meat.
Wilt the Greens and Build Flavor
Once your bacon is crisp and your kitchen smells amazing, it’s time for the main event. Add your clean, chopped collards to the pot. Don't worry if it looks like an impossible amount of greens; they will wilt down significantly as they cook. Stir them around in the hot bacon fat to get them coated, allowing them to absorb all the delicious flavors you've started building. This is also the perfect time to add a splash of apple cider vinegar. The acidity brightens everything up and provides a perfect counterpoint to the rich, savory notes of the bacon and smoked turkey.
Simmer Low and Slow for Tenderness
Here’s where patience becomes your most important ingredient. After adding your broth or water and bringing everything to a boil, reduce the heat to low, cover the pot, and let it all simmer. A long, slow simmer is the secret to getting those perfectly tender greens that melt in your mouth. We recommend letting them go for at least three to four hours. This extended cooking time allows the tough leaves to break down completely while soaking up every bit of flavor from the broth. Trust us, this slow-and-steady approach is what transforms a simple vegetable into a true Southern delicacy.
How to Get That Perfect Tender-Yet-Flavorful Bite
Getting collard greens just right is an art form. You’re looking for that perfect balance where the leaves are silky and tender but not mushy, and every bite is packed with a deep, savory flavor. It’s easier than you think to achieve this at home. The secret isn’t about a complicated process; it’s about patience and using the right ingredients to build layers of flavor. When you let the greens simmer away, they transform from a tough, leafy vegetable into a melt-in-your-mouth side dish that defines Southern comfort. It’s all about giving them the time they need to absorb all the goodness you’ve added to the pot. This isn't a dish you can rush. The transformation from crisp, slightly bitter leaves to a savory, tender delicacy happens slowly, as the heat gently breaks down the tough fibers and the greens soak up the rich flavors of the broth, bacon, and spices. It's a process that fills your kitchen with an incredible aroma, a preview of the delicious meal to come. Let’s walk through the three key steps to making sure your collard greens are perfectly tender and flavorful every single time.
The Magic of Cooking Low and Slow
Patience is the most important ingredient for tender collard greens. To break down their tough texture, you need to let them cook low and slow. After bringing your pot to a boil, reduce the heat and let the greens simmer for at least three to four hours. This long, slow cooking process is what allows the tough fibers in the leaves to relax and soften, resulting in that signature silky texture. Rushing this step will leave you with chewy, tough greens, which is something no one wants. Just let them do their thing on the stove, and you’ll be rewarded with perfectly tender greens that have soaked up every bit of flavor from the pot.
Use Bacon Fat and Broth for Richness
To get that authentic Southern flavor, you need a rich, savory base. Starting with bacon fat is a classic technique that adds a smoky, salty depth that you just can’t get from oil alone. After you’ve rendered your bacon, don’t you dare throw that grease away. That’s liquid gold. You’ll wilt your greens right in it. For even more richness, use a flavorful broth instead of just water. A broth made from a smoked turkey leg or ham hock will infuse the greens with an incredible, savory taste. This method of building flavor is what makes a simple pot of greens taste like they came straight from a Southern kitchen.
Know When They're Perfectly Done
While collards need a long time to cook, you don’t want to forget about them completely. It’s a good idea to start checking them for tenderness after about 45 minutes of simmering. This gives you a baseline and helps you see how they’re progressing. Give a leaf a taste. Is it starting to soften? Is the flavor developing? The goal is for the greens to be completely tender and easy to chew without being mushy. The exact time can vary depending on the freshness and size of your greens, but the long simmer is non-negotiable. Keep checking every half hour or so until they reach that perfect, melt-in-your-mouth consistency.
How to Perfectly Season Your Collard Greens
The secret to truly memorable collard greens isn't just in the cooking; it's in the seasoning. Getting that perfect balance of savory, sweet, tangy, and spicy is what separates good greens from great ones. It might sound tricky, but it’s actually pretty simple once you know the key ingredients. Here are a few tips to help you season your collard greens perfectly every time, creating a side dish that might just steal the show.
Balance the Flavor with Apple Cider Vinegar
To get that classic Southern tang, a little apple cider vinegar is your best friend. It cuts through the richness of the bacon fat and balances the sweetness from the brown sugar, creating a perfectly harmonious bite. You don't need much; just a splash toward the end of the cooking time is enough to brighten up the whole pot. This simple addition is what gives the greens a well-rounded flavor and keeps them from feeling too heavy. It’s a small step that makes a huge difference in the final dish.
Add a Kick with Hot Sauce or Cajun Spice
If you like your greens with a little personality, don't be shy with the heat. A few dashes of your favorite hot sauce or a sprinkle of Cajun seasoning can add a wonderful warmth that complements the savory bacon. The key is to add it near the end of cooking so the spice tastes fresh and zesty, not muddled. Start with a small amount, give it a taste, and add more until you hit your perfect spice level. This is your chance to customize the dish and make it truly your own.
Bring the Heat with Garlic and Jalapeños
For those who really want to turn up the temperature, fresh ingredients are the way to go. Sautéing some minced garlic with your bacon at the beginning builds a fragrant foundation. Then, for a real kick, add finely chopped jalapeños along with your greens. If you’re feeling brave, leave some of the seeds in for an extra punch of spice. This method doesn't just add heat; it introduces complex layers of flavor that make your collard greens completely irresistible. It’s a simple way to add a fresh, vibrant heat.
Avoid These Common Collard Green Mistakes
Making truly great collard greens is an art, but it’s one you can definitely master. It usually comes down to avoiding a few common slip-ups that can turn your beautiful greens into a bitter, gritty, or mushy mess. We’ve all been there! But with a few simple tips, you can get that perfect, tender, and flavorful pot of greens every single time. It's all about starting with the right ingredients and treating them with a little care. From the moment you pick a bunch at the store to the final simmer in the pot, each step plays a crucial role. Let’s walk through what to watch out for, so you can confidently serve up a side dish that tastes like it came straight from a Southern kitchen.
Picking and Storing Your Greens Incorrectly
Your journey to delicious collards starts in the produce aisle. When you’re picking out a bunch, try to steer clear of the really large, tough-looking leaves, as they can be more bitter. Instead, look for smaller, vibrant green leaves that feel crisp. Once you get them home, don’t just toss them in the fridge. To keep them fresh for up to a week, wrap the unwashed greens in a damp paper towel and place them in a sealed bag in your crisper drawer. This little bit of proper storage makes a huge difference in their texture and flavor when you’re ready to cook.
Not Prepping Your Greens Properly
One of the biggest mistakes you can make is not giving your greens a good wash. Collards grow in sandy soil, and that grit loves to hide in the leaves. Nothing ruins a bite of greens faster than a mouthful of sand! To clean them right, fill your sink or a large bowl with cold water and let the leaves soak for about 10 minutes to loosen any dirt. Then, rinse each leaf individually under running water. After they’re clean, be sure to remove the tough, woody stems. For big leaves, you can slice the leafy part away from the stem. For smaller ones, just trim off the thickest part at the base.
Nailing the Cook Time and Seasoning
There’s a sweet spot between crunchy, undercooked greens and mushy, overcooked ones. The key is a low and slow simmer. Aim to cook them on low heat for about an hour, but start checking for tenderness around the 45-minute mark. Cutting the leaves into strips also helps them cook more evenly. For that authentic Southern flavor you’ll find on our menu, cooking the greens in fat is a must. Bacon grease is traditional for a reason; it adds a smoky, savory depth that’s hard to beat. Finally, don’t be shy with your seasonings. Salt, garlic, and a little pepper are essential, so taste as you go and adjust until the flavor is perfect.
What to Serve With Your Collard Greens
Collard greens are one of the most versatile dishes on a Southern table. They can stand proudly on their own or complement just about any main course you can think of. Whether you’re planning a big family dinner or a simple weeknight meal, here are a few ideas for what to serve with your perfectly cooked greens.
Classic Southern Pairings
Collard greens are a true team player on any Southern plate. For a classic combination, you can't go wrong with a slice of warm cornbread. It’s the perfect tool for soaking up every last drop of the "pot likker," that savory, nutrient-rich broth left in the pot. Dipping your cornbread is a cherished tradition for a reason; it’s simply delicious. Of course, collards also sit perfectly next to other Southern stars like crispy fried chicken, creamy mac and cheese, or a plate of pulled pork. Check out our full menu for more pairing inspiration.
Turn Your Side Into a Main Course
While collards make an incredible side, they're hearty enough to be the main event. To turn this dish into a full meal, try swapping the bacon for smoked turkey wings or legs. The smoked turkey adds a deep, savory flavor that makes the greens rich and satisfying without being too heavy. Serve a generous portion over a bed of creamy grits or fluffy white rice, and you have a complete, comforting meal right there. It’s a fantastic way to enjoy this Southern staple as a standalone star.
Storing and Reheating Leftover Collard Greens
One of the best parts of making a big pot of collard greens is knowing you’ll have leftovers. In fact, many Southern cooks will tell you that collards are even better the next day, after all those savory, sweet, and smoky flavors have had more time to get to know each other. But to make sure your second-day greens are just as delicious as the first, you need to store and reheat them the right way. It’s simple to do and makes a world of difference.
Properly storing your greens keeps them safe to eat and preserves their amazing flavor and texture. Whether you’re planning to eat them tomorrow or save them for a future meal, a few easy steps will ensure they’re ready to go when you are.
How to Store Leftovers
Once your collard greens have cooled down, the best way to store them is in the refrigerator. Spoon them into an airtight container to keep them from drying out or absorbing other odors from the fridge. Stored this way, your cooked greens will stay fresh and delicious for about three to five days. If you’ve made a larger batch than you can eat in a few days, freezing is a great option. Just pack the cooled greens into a freezer-safe bag or container, press out any excess air, and they’ll keep well for several months. Following proper food storage safety guidelines ensures your leftovers are always ready for another meal.
The Best Way to Reheat Your Greens
When you’re ready to enjoy your leftovers, reheating them on the stovetop is the best way to go. This gentle method helps the greens retain their moisture and texture. Simply place the collards in a small pot or saucepan over low heat. Add a splash of chicken broth, pot likker, or even just water to create a little steam and prevent them from sticking or drying out. Stir them occasionally until they are warmed all the way through. While you can use a microwave if you’re short on time, the stovetop method gives you a much better result, bringing the greens back to life without making them rubbery.
Related Articles
- The Best Southern Style Collard Greens Recipe — Notch8 Carolina Kitchen
- The Ultimate Southern Collard Greens with Ham Hocks — Notch8 Carolina Kitchen
- How to Make Authentic Collard Greens Southern Style — Notch8 Carolina Kitchen
Frequently Asked Questions
My collard greens always turn out bitter. What am I doing wrong? Bitterness is a common challenge, but it’s easy to fix. The solution is all about balance. First, make sure you’re cooking them long enough; the low-and-slow simmer helps mellow out their flavor. Second, a little sweetness goes a long way. The brown sugar in our recipe isn't just for taste, it directly counteracts any bitterness. Finally, a splash of apple cider vinegar at the end brightens the whole dish and cuts through any remaining sharp flavors.
Is it really necessary to cook collards for several hours? Yes, patience is truly the secret ingredient here. Collard leaves are naturally tough, and a long, slow simmer is what breaks down those sturdy fibers, transforming them into something silky and tender. Rushing the process will likely leave you with chewy greens. This extended cooking time also gives the collards a chance to soak up all the savory goodness from the bacon, broth, and seasonings, creating a much deeper, more complex flavor.
Can I make this recipe without bacon or other pork products? Absolutely. While bacon provides a classic smoky flavor and a rich fat to cook in, you can get a wonderful result using smoked turkey. A smoked turkey wing or leg simmered in the pot will give you that deep, savory flavor. Just start by sautéing your aromatics in a little olive oil or other neutral fat instead of the bacon grease, then proceed with the recipe as written.
What exactly is "pot likker" and what should I do with it? Pot likker (or pot liquor) is the delicious, nutrient-packed broth left in the pot after the collard greens have finished cooking. It’s a concentrated liquid full of all the flavors from the greens, the smoked meat, and the seasonings. Whatever you do, don't throw it away. We serve it right alongside the greens. It's perfect for dipping cornbread into, which is a cherished Southern tradition.
I'm short on time. Can I use frozen collard greens instead of fresh? You can definitely use frozen collard greens as a shortcut. The biggest advantage is that the washing and chopping are already done for you. Just be aware that the texture might be a little softer than what you'd get from fresh greens. You will still want to cook them low and slow to build that deep, savory flavor, so don't skip the long simmer time.