
Old Fashioned Southern Collard Greens with Bacon
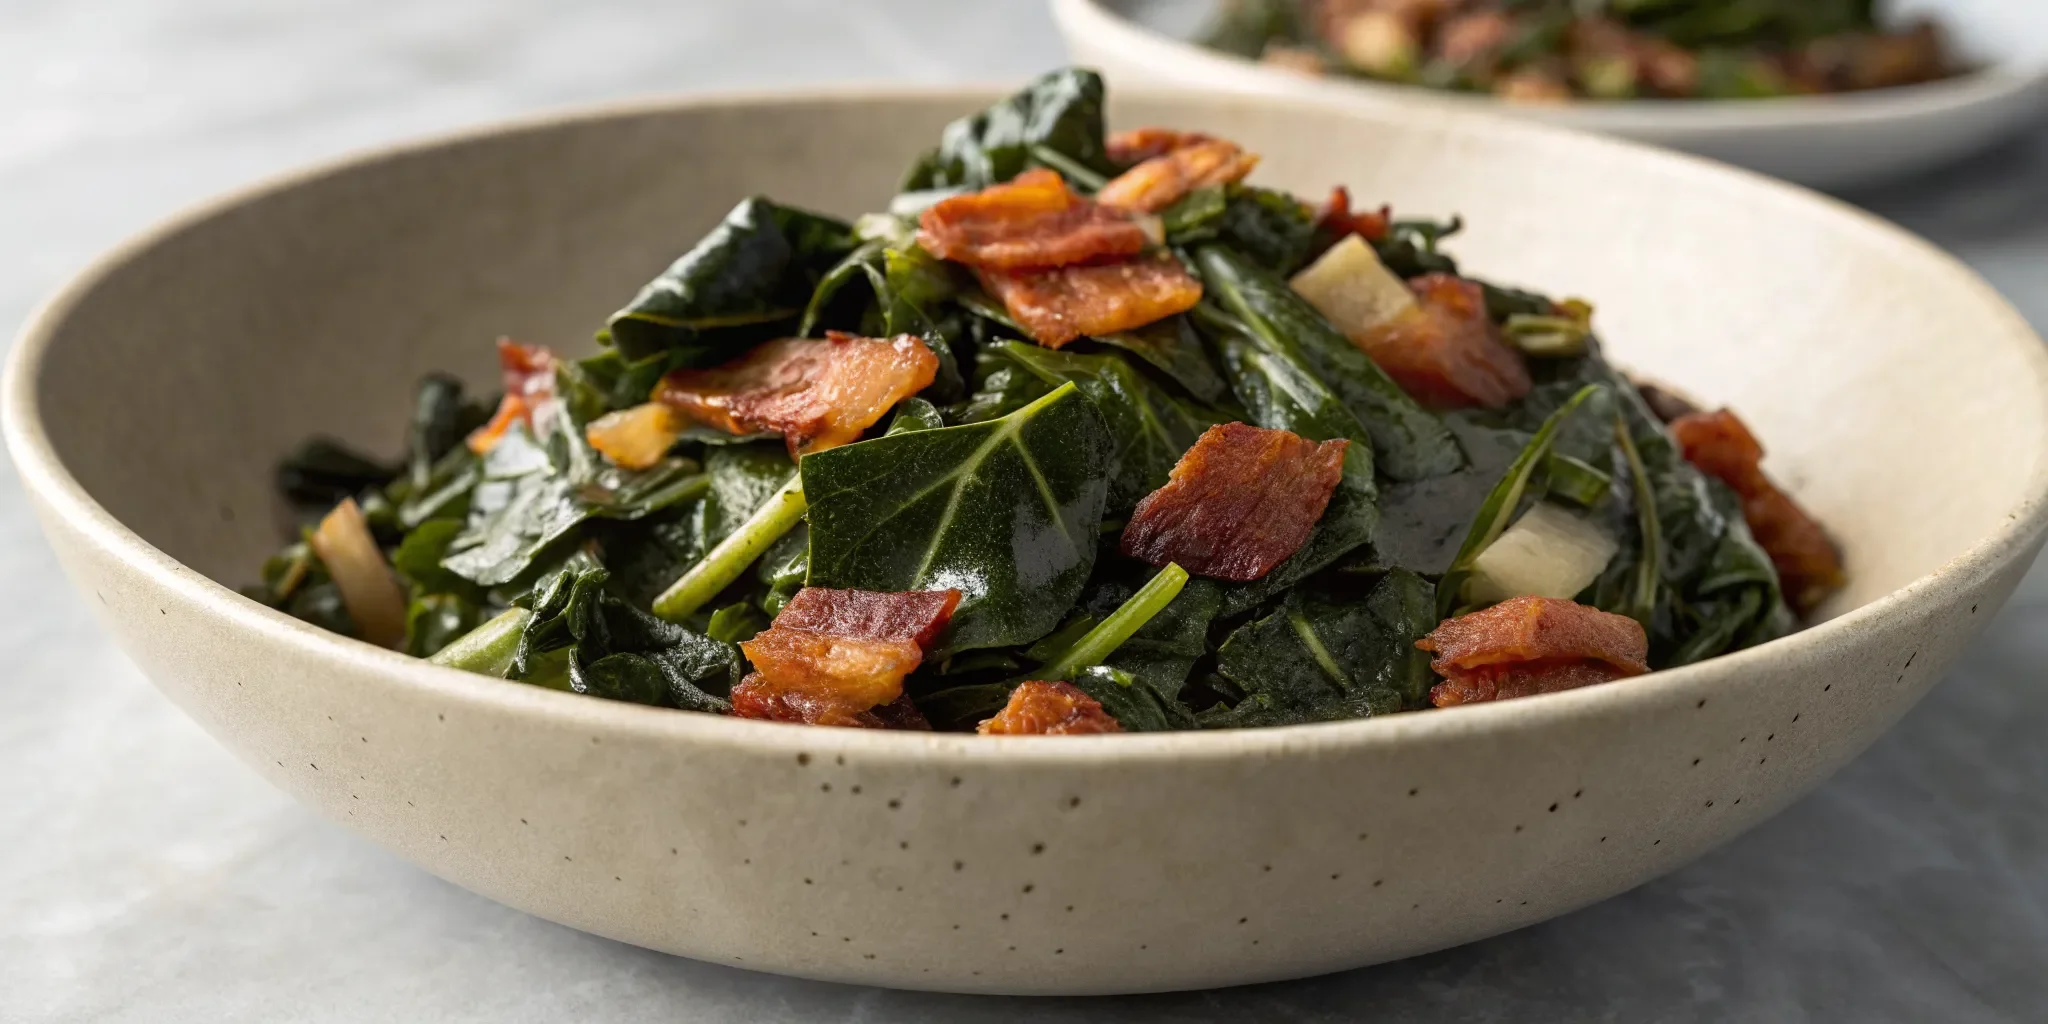
The smell of bacon rendering in a heavy-bottomed pot is the opening act for some of the South’s best dishes. When you add onions, garlic, and a mountain of fresh greens, you get a kitchen aroma that’s pure comfort. This is the heart of making old fashioned southern style collard greens with bacon. It’s a process that’s as rewarding as the final dish. While we love serving up our classic version at the restaurant, we believe everyone should know how to make a perfect pot at home. Follow along as we break down the simple, step-by-step process.
Key Takeaways
- Prep your greens correctly for the best texture: To avoid gritty, tough collards, always soak and rinse the leaves thoroughly. Removing the thick center stem from each leaf is just as important for ensuring they become melt-in-your-mouth tender.
- Embrace the low and slow simmer: The secret to deep flavor and tender greens is patience. After creating a savory base with bacon and aromatics, let your collards simmer gently for at least 45 minutes so they can break down and absorb the seasoned broth.
- Fight bitterness with fat and acid: The classic Southern method for perfectly savory collards involves two key ingredients. Use a rich fat, like bacon grease, to smooth out the flavor, and finish with a splash of vinegar to brighten the dish and cut any remaining bitterness.
What Are Collard Greens?
If you’ve spent any time in the South, you know collard greens are a staple on just about every table. They’re a member of the cabbage family, with large, dark green leaves and a slightly earthy flavor that becomes wonderfully savory when cooked down. But collards are more than just a delicious side dish; they’re a food with a deep story and some serious health benefits. Before we get to cooking, let's talk about what makes this leafy green so special.
A Quick History of Collards in Southern Cooking
Collard greens hold a significant place in Southern food traditions, with roots stretching deep into African American history. Their story is one of resilience and cultural heritage. Enslaved Africans brought their knowledge of growing and cooking these hardy greens to America, transforming them into a cornerstone of Southern cuisine. During slavery, collard greens were one of the few vegetables that families were permitted to grow for themselves. This made them a vital source of nourishment and a symbol of self-sufficiency. This rich taste of history is what you experience in every tender, flavorful bite.
Why They're Good for You
Beyond their incredible flavor and history, collard greens are a nutritional powerhouse. It’s always a win when something so comforting is also great for you. These greens are loaded with vitamins and minerals that support your overall health. They are an excellent source of vitamins K, C, and A, along with folate and calcium. In fact, the nutritional benefits of collard greens are quite impressive. The vitamin K found in collards is fantastic for maintaining healthy bones because it helps your body absorb calcium effectively. Plus, they are packed with fiber and antioxidants, making them a truly wholesome addition to any meal.
What You'll Need for Southern Collard Greens
Making truly great Southern collard greens is all about starting with the right ingredients. There are no shortcuts to that slow-simmered, savory flavor we all crave, but the good news is that the ingredient list is simple and straightforward. Think of it in three parts: the greens themselves, the smoky foundation, and the flavorful liquid that brings it all together. Getting these three components right is the key to a perfect pot of greens every single time.
Of course, if you're short on time but still need that taste of home, you can always let us handle the cooking. We've got our recipe down to a science, and you can easily order a side to go with your meal. But if you're ready to make them yourself, gathering these simple, high-quality ingredients is your first step toward a delicious and rewarding kitchen project. Let's walk through what you'll need to have on hand.
Pick the Best Greens
Your collard greens will only be as good as the leaves you start with, so it pays to be a little picky at the grocery store. Look for bunches with vibrant, dark green leaves. They should feel firm and crisp, not limp or wilted. Avoid any leaves that have yellowing edges or brown spots, as those are signs that they’re past their prime. While you can find collards year-round, they are often at their freshest and most tender from January through April. Taking a moment to select the best bunch is a small step that makes a huge difference in the final dish.
For Smoky Flavor: Bacon and Aromatics
The secret to authentic Southern collards is building a deep, smoky flavor base before the greens even hit the pot. This recipe uses bacon, which is a classic choice for a reason. You’ll start by cooking the bacon until it’s nice and crispy. Then, you’ll use that rendered bacon grease (don't you dare throw it out!) to sauté your aromatics, like diced onion and minced garlic. This step infuses the entire dish with a rich, savory flavor that perfectly complements the greens. Many Southern cooking traditions use smoked meats like ham hocks or turkey necks to achieve a similar result.
The Perfect Blend of Seasonings and Liquid
The magic happens in the liquid the collards simmer in, a flavorful broth affectionately known as "pot likker." This isn't just water; it's a carefully balanced blend that tenderizes the greens and cuts their natural bitterness. You’ll need a good quality chicken broth as your base. Then, add a splash of apple cider vinegar for a bright, acidic tang and a pinch of sugar to balance everything out. Finally, a mix of seasonings like Cajun seasoning, paprika, and red pepper flakes adds warmth and a gentle kick. This seasoned liquid is what transforms a simple leafy green into the soul-warming side dish we feature on our menu.
How to Prep Your Collard Greens
Before you even think about bacon or broth, let's talk prep. Getting your collard greens ready for the pot is the most important step for achieving that perfect, tender texture we all love. It might seem like a little extra work, but taking the time to properly clean and chop your greens makes all the difference. This is the foundation of a truly great pot of collards, just like the ones we serve at our kitchen. Let's walk through it together.
Wash Your Greens Thoroughly
First things first, you have to wash your greens, and I mean really wash them. Collards grow in sandy soil, and they are notorious for hiding grit in their leaves. The best way to get them clean is to give them a good soak in a sink full of cold water. Let them sit for about 10 minutes, swishing them around a few times to loosen any dirt. After they’ve soaked, pull each leaf out and rinse it under running water, checking both sides. It’s a non-negotiable step for silky, grit-free greens.
Remove the Tough Stems
Next up: the stems. The thick, woody stem running down the center of each collard leaf is tough and fibrous, and it won't break down enough during cooking. You'll want to remove it for the best texture. The easiest way to do this is to fold each leaf in half lengthwise, like you're closing a book. Then, simply run your knife along the inside of the fold to cut out the tough stem and rib. You can do this before or after you wash, but I find it's a bit easier to handle the leaves once they're clean and slightly damp.
Chop the Leaves
Now that your greens are clean and stem-free, it's time to chop. You can stack a few leaves on top of each other, roll them up tightly like a cigar, and then slice them into ribbons. Aim for pieces that are about one to two inches wide. Don't worry if your pot looks like it's overflowing at first. Collard greens shrink significantly once they hit the heat. Because of this, you'll probably need to add them to your pot in batches. Just add a handful, let it wilt down for a minute, and then add the next until all your greens are in.
Cooking Southern Collard Greens: A Step-by-Step Guide
Alright, let's get these greens on the stove. This process is all about building layers of flavor, from the smoky bacon to the savory broth. Follow these simple steps, and you'll have a pot of perfect Southern collard greens that taste like they've been simmering all day.
Step 1: Render the Bacon
First things first, let's cook the bacon. Place your chopped bacon in a large, heavy-bottomed pot or Dutch oven over medium heat. Let it cook until it's nice and crispy. This step does two wonderful things: it gives you crunchy bacon bits to stir in later and creates a flavorful bacon fat base. Once the bacon is crisp, use a slotted spoon to transfer it to a paper towel-lined plate. Don't you dare discard that liquid gold in the pot! We'll use that delicious, rendered fat to cook our vegetables in the next step.
Step 2: Sauté Your Aromatics
Now for the part that makes your whole kitchen smell incredible. With the bacon fat still in the pot, add your diced onion and minced garlic. Sauté them over medium heat, stirring occasionally until the onion becomes soft and translucent. This usually takes about five minutes. You're not just cooking onions and garlic; you're creating a foundational layer of flavor that will infuse the entire dish. Once they're fragrant and tender, go ahead and add the crispy bacon back into the pot. This ensures every bite has a little bit of that smoky, savory goodness.
Step 3: Wilt the Greens and Add Liquid
It's time for the main event. Start adding your prepared collard greens to the pot in large handfuls. It might look like a mountain of greens at first, but don't worry. Stir them into the bacon and onion mixture, and they will quickly begin to wilt down. Once all the greens have been added and have cooked down a bit, pour in your chicken broth and add your seasonings. Give everything a good stir, bring the liquid to a gentle simmer, then reduce the heat to low and cover the pot. The greens are now ready for their slow, flavor-soaking bath.
Step 4: Simmer Low and Slow
Patience is the secret ingredient here. Let your collard greens simmer on low heat for at least 35 to 40 minutes, or even longer if you like them extra tender. This "low and slow" method is what breaks down the tough leaves and allows them to absorb all the smoky, savory flavors in the pot. Be sure to give them a stir every 10 minutes or so to prevent sticking and ensure they cook evenly. When they're done, the greens will be tender with a slight bite. And if you're ever short on time, you can always order a side of our classic collards to get your fix.
How to Make Sure Your Collards Aren't Bitter
Nothing is more disappointing than a pot of bitter collard greens. If you've been hesitant to make them at home for this very reason, I completely understand. But achieving that perfectly savory, tender, and not-at-all-bitter flavor is easier than you might think. It all comes down to a few key Southern cooking secrets that we live by here at Notch8. When you see collard greens on our menu, you can trust they've been cooked with care to bring out their best flavor. Let's walk through how you can do the same at home.
Balance with Fat and Acid
The first rule for delicious collards is to embrace the fat. Traditional Southern recipes call for cooking the greens in some kind of pork fat, and for good reason. Whether you use bacon grease, a ham hock, or salt pork, the fat does more than just add a smoky, savory flavor. It actively works to cut the bitterness inherent in the leaves, creating a much smoother taste. A splash of apple cider vinegar or your favorite hot sauce at the end also introduces a bright acidity that balances everything out, creating that complex flavor profile we all love.
Don't Rush the Cooking Time
If your collards have turned out bitter in the past, you might have been cooking them too quickly. This is one dish where "low and slow" is the only way to go. You need to give the tough leaves enough time to break down, soften, and release their bitterness into the cooking liquid. Plan to let your greens simmer for at least an hour over low heat. Start checking them for tenderness around the 45-minute mark. This slow-cooking method is what transforms them from a tough green into a silky, melt-in-your-mouth side dish. It's a process that requires patience, but the results are always worth it.
Get the Pot Likker Just Right
Have you ever heard of "pot likker"? It's the magical, nutrient-rich broth left behind after the collards have finished cooking. This isn't just leftover water; it's a deeply flavorful liquid infused with the essence of the greens, bacon, and seasonings. The pot likker is crucial because it helps draw out any remaining bitterness while seasoning the collards from the inside out. Don't you dare pour it down the drain when you're done! This Southern-style pot likker is liquid gold and can be used to add incredible depth to soups, gravies, or for sopping up with a piece of cornbread.
Common Collard Green Mistakes to Avoid
Making truly great collard greens is an art, but it's one you can definitely master. Most of the time, when a batch doesn't turn out quite right, it comes down to a few simple, avoidable missteps. Let's walk through the most common mistakes so you can get that perfect, tender, and flavorful pot of greens every single time. Getting these details right is how we ensure every side of collards at Notch8 is packed with authentic Southern flavor, and you can do it at home, too.
Not Washing Them Enough
This is the number one rule of cooking collards: wash them well. Collard greens grow in sandy soil, and nothing ruins a good meal faster than a gritty bite. To get them perfectly clean, fill your sink or a large bowl with cold water and let the greens soak for at least 10 minutes. Swish them around to loosen any dirt. After soaking, you should still rinse each leaf individually under running water. It might seem like a lot of work, but taking this extra step ensures your final dish is delicious and completely grit-free.
Using the Wrong Kind of Greens
The greens you choose at the store make a big difference. For the most tender and least bitter results, look for smaller, younger collard leaves, sometimes labeled "baby collards." When you're picking out a bunch, make sure the leaves are a vibrant, deep green and feel crisp to the touch. You'll want to avoid any bunches that look yellow, have brown spots, or seem wilted. The fresher your greens are to start, the better they will taste in the end. A trip to a local farmers market can often yield the best and freshest produce.
Forgetting to Remove the Stems
The thick stem running down the center of a collard leaf is tough and fibrous, and it won't break down as nicely as the tender leaves. It's best to remove them before you start chopping. The easiest way to do this is to fold the leaf in half lengthwise and slice the stem away with a sharp knife. Removing the stems also makes the washing process more effective, since a lot of dirt can get trapped in the crevices where the stem meets the leaf. This simple prep step is key to achieving that perfect, melt-in-your-mouth texture.
Rushing the Simmer
Patience is a key ingredient in Southern cooking, and collard greens are no exception. If you try to cook them too quickly over high heat, they’ll end up tough and bitter. The magic happens when you let them simmer low and slow. This gentle cooking process allows the tough fibers in the leaves to break down, making them incredibly tender. Plan for at least an hour of simmering time, though some cooks go even longer. Start tasting them for tenderness and flavor around the 45-minute mark, and let them keep going until they’re just right.
Skimping on Fat or Seasoning
Collard greens need fat and bold seasoning to transform into the rich, savory dish we all love. Fat, especially a smoked pork fat like bacon grease, is essential for creating a deep flavor and balancing any natural bitterness in the greens. Don't be shy here. This is comfort food, after all. At Notch8, we build layers of flavor with smoked meats and a special blend of seasonings, which you can see in our full menu. At home, make sure you season your pot likker well with salt, pepper, a little sugar, and maybe a dash of vinegar to get that signature Southern taste.
What to Serve with Your Collard Greens
Once you have a perfect pot of tender, savory collards, the next step is building the rest of your meal. Collard greens are a team player, and they shine brightest when served alongside other Southern classics. Whether you're planning a simple weeknight dinner or a full-blown holiday feast, these pairings will help you create a comforting and complete plate.
Perfect Southern Pairings
Collard greens are a cornerstone of Southern cuisine, so it’s no surprise they pair beautifully with other traditional dishes. Think of them alongside creamy macaroni and cheese, a hearty slice of meatloaf, or a juicy pork tenderloin. Of course, you can’t forget a piece of skillet cornbread for sopping up every last bit of that delicious pot likker. You can find many of these classic sides and main courses right on our menu.
For a classic New Year's Day meal, serving collards with black-eyed peas is a time-honored tradition meant to bring good luck and prosperity in the year ahead. They’re a versatile side that truly complements any Southern-style spread.
Finishing Touches: Hot Sauce and Vinegar
To really make the flavors of your collard greens pop, a few simple additions at the table can make all the difference. A splash of vinegar, like apple cider vinegar, is a fantastic way to cut through the richness of the bacon and brighten the overall taste of the greens. You can add a little to the pot while they simmer, but offering it at the table lets everyone customize their own bowl.
A bottle of hot sauce is another essential condiment. It adds a welcome kick of heat that contrasts nicely with the savory, smoky flavor of the collards. When you visit us at the restaurant, you’ll find these on the table so you can get your greens exactly how you like them.
Storing and Freezing Leftover Collards
One of the best parts about making a big pot of collard greens is having leftovers for the week. Storing them correctly ensures they taste just as good on day three as they did on day one. If you don't have time to cook, you can always stop by Notch8 for a plate of our classic Southern sides, available for dine-in or takeout.
How to Store Leftovers
Once your collard greens have cooled down, transfer them to an airtight container. They will keep well in the refrigerator for up to five days. The most important tip is to store the greens with their cooking liquid, often called "pot likker," to keep them moist and flavorful. This simple step helps the greens maintain their texture and taste when you reheat them later in the week. Properly stored greens make for a quick and delicious side dish for any meal, saving you time without sacrificing that homemade comfort.
Tips for Freezing and Reheating
If you want to save your collards for longer, freezing is a fantastic option. Let the greens cool completely, then pack them into freezer-safe bags or containers, leaving a little room at the top for expansion. They’ll last for up to three months in the freezer, giving you a taste of Southern comfort whenever you need it. When you’re ready to eat them, you can thaw them in the fridge overnight or gently reheat them from frozen on the stovetop over low heat. Adding a splash of water or broth can help if they seem a bit dry.
How to Use Leftover Greens
Don’t let any of that delicious pot likker go to waste! This savory, nutrient-rich broth is a Southern treasure in its own right. You can use leftover greens and their likker as a flavorful base for hearty soups and stews. Another fantastic idea is to simply warm up the broth and soak cornbread in it for a simple, soulful snack that will transport you right back to your grandma’s kitchen. It’s a comforting way to enjoy every last drop of flavor from your hard work.
Related Articles
- The Best Southern Style Collard Greens Recipe — Notch8 Carolina Kitchen
- Best Collard Greens Recipe with Bacon and Brown Sugar — Notch8 Carolina Kitchen
- The Ultimate Southern Collard Greens with Ham Hocks — Notch8 Carolina Kitchen
- How to Make Authentic Collard Greens Southern Style — Notch8 Carolina Kitchen
- Southern Collard Greens with Smoked Turkey & Vinegar — Notch8 Carolina Kitchen
Frequently Asked Questions
Can I make Southern collard greens without using pork? Absolutely. While bacon or ham hocks provide a classic smoky flavor, you can get a similar result by using smoked turkey wings or necks. For a vegetarian version, you can build flavor by sautéing your onions and garlic in a neutral oil and adding a generous amount of smoked paprika to the pot. Just be sure to use a rich, high-quality vegetable broth to create a savory cooking liquid.
Why are my collard greens still tough after cooking for an hour? If your greens are still tough, the simple answer is that they just need more time. The total cooking time can vary depending on the age and size of the leaves you started with. Don't turn up the heat to speed things up. Instead, just keep them simmering on low, covered, and check them for tenderness every 15 minutes or so. Patience is truly the key to that perfect, melt-in-your-mouth texture.
What exactly is "pot likker" and what should I do with it? Pot likker is the wonderfully flavorful and nutrient-dense broth left in the pot after the collards have finished cooking. It’s a Southern treasure, so please don't pour it down the drain. The most traditional way to enjoy it is by sopping it up with a piece of warm cornbread. You can also save it and use it as a delicious base for soups or to add flavor to gravies.
Is there a way to fix bitter collards after they're already cooked? Yes, you can often salvage a slightly bitter pot of greens. A great trick is to add a splash of acidity and a touch of sweetness to balance the flavors. Try stirring in a teaspoon of apple cider vinegar and a small pinch of sugar. Let it simmer for another ten minutes and taste. A few dashes of your favorite hot sauce can also work wonders to cut through any lingering bitterness.
Do collard greens taste better the next day? Many people, myself included, believe they do. Letting the collard greens rest in the refrigerator overnight gives all the flavors (the smoky bacon, the savory broth, and the earthy greens) a chance to meld together and deepen. When you reheat them, you'll often find they are even more flavorful than when they first came off the stove.